In this post, I will be providing you the steps to set up Angular in Visual Studio 2017
Step 1 : Install Node.js and npm
After:


PS: Sometimes one might see this error in while building the project in VS:
Step 1 : Install Node.js and npm
- node version 4.6.x or greater
- npm version 3.x.x or greater
- Site to download: https://nodejs.org/en/download/
- To check the versions installed run following commands from cmd prompt (if node and npm are not installed on the system, the commands will not run and it will say “unrecognized internal or external command)
- node –v
- npm –v
Step
2: You also need VS 2017 (or VS 2015 update 3)
Step
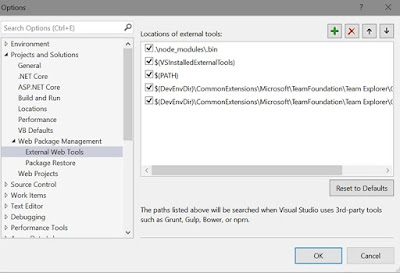
3: Configure environment settings for node and nmp
- Tools -> Options -> Projects and Solutions -> External Web Tools
- Move global path entry above the dev environment entry. This tells VS that look for external tools like npm is global path before internal paths
Before:

After:

Step
4: Install TypeScript for VS 2017
- Angular 2 requires TypeScript version 2.2.0 or later
- Download TypeScript For visual Studio 2017 from here
https://www.microsoft.com/en-ca/download/details.aspx?id=55258
For VS 2015 from here:
https://www.microsoft.com/en-us/download/details.aspx?id=48593
- To check the version of typescript installed in VS, go to help-> About

Step
5: Download “Quick Start Files” from Angular web site
https://github.com/angular/quickstart Click
on “clone or download” button and download zip file
Step
6: Create an empty web application in Visual Studio
Step
7: Copy “Quick Start Files” in created web application:
- We don’t need all the files from extracted “Quick Start Files” only following are required to be copied to empty web application)
§ “scr”
folder and all its content
§ bs-config.json
§ package.json
§ tslint.json
- Copy all these 4 items to the root project folder of the web application solution
Step
8: Restore required packages
- Right click on the package.json -> restore packages (if the restore option is not available , try restarting Visual Studio and do clean solution)
- Caution: it restores all the packages in the projects and a new folder node_modules folder is also seen under the projects, make sure that you don’t include that in the project.
Step
9 : Run the Project from command prompt
- Open Command prompt
- Go to root project location
- And then type nmp start
- It does following things
§ Launch
TypeScript compiler and compiles the application code
§ After
that launches lite server which in turns launches the browser
- Now go and do a changes in startup project file "app.component.ts" and save it. This will directly be reflected in the browser as the lite-server is listening to the changes we are doing in the project files.
- At this point we don’t have an option to run the Project in Visual Studio by pressing F5 or Ctlr + F5 that’s due to the wrong required file (css, and js) locatiosn in index.html page to fix that do following:

§ Changes <base href="/">
to <base href="/src/">
§ Change
script location to have a forward “/” before node_modules
<script src="/node_modules/core-js/client/shim.min.js"></script> <script src="/node_modules/zone.js/dist/zone.js"></script>
<script src="/node_modules/systemjs/dist/system.src.js"></script>
§ We
also need to make a change in systemjs.config.js - 'npm:': '/node_modules/

PS: Sometimes one might see this error in while building the project in VS:
"(TS) Property 'lift' in type 'Subject<T>' is not assignable to the same property in base type 'Observable<T>'. Type '<R>(operator: Operator<T, R>) => Observable<T>' is not assignable to type '<R>(operator: Operator<T, R>) => Observable<R>'. Type 'Observable<T>' is not assignable to type 'Observable<R>'. Type 'T' is not assignable to type 'R'."

To solve this issue, inside file
tsconfig.json, put it in "compilerOptions" and set it to true.
Informative blog. Thanks for sharing.
ReplyDeleteAngular JS Online training
Angular JS training in hyderabad
Awesome post thanks for sharing this post
ReplyDeleteFull Stack Training in Chennai | Certification | Online Training Course| Full Stack Training in Bangalore | Certification | Online Training Course | Full Stack Training in Hyderabad | Certification | Online Training Course | Full Stack Developer Training in Chennai | Mean Stack Developer Training in Chennai | Full Stack Training | Certification | Full Stack Online Training Course